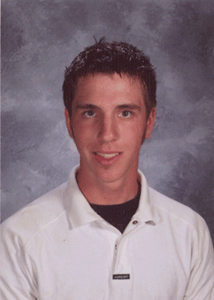
Photoshop Chapter 1: In the Lab 1
Problem: As a member of your high school reunion committee, it is your task to assemble the class photo directory. You are to edit the photo of a high school picture and prepare it for print in the reunion directory. The photo needs to fit in a space 1.75 inches high and 1.33 inches wide. Each photo needs to have approximately the same amount of space above the headshot -- .25 inches. The edited photo is displayed.
Instructions:
- Start Photoshop.
- Open the file, Student, from the Photoshop Chapter 01 folder.
- Use the Save As command on the File menu to save the file on your in your PS_lesson_1 folder with the name, Student_Edited. If Photoshop displays a JPEG Options dialog box, click the OK button.
- Use the Navigator palette to zoom the photo to 50 percent magnification, if necessary.
- If the rulers do not display, press Command+R to view the rulers.
- Drag from the horizontal ruler down into the photo until the green ruler guide touches the top of the students head. Obtain the vertical measurement of the top of tech student's head by measuring where the line touches the vertical ruler. Drag a second ruler guide to a position .25 inches above the first one. If you make a mistake while dragging a ruler guide, click Undo New Guide on tech Edit menu.
- Select the Crop tool. Drag from the left margin at the upper green line, down and to the right to include all the lower portion of the photo. Hint: If your selection is not perfect, press the ESC key and then drag again.
- Press the ENTER key. If your crop does not seem correct, click the undo command on the Edit menu and repeat Steps 6 and 7.
- Once your photo has .25 inches of space above the student's head, save the photo again.
- Now you will add a border to the photo by doing the following:
- Press Command+A to select all of the photo.
- On the Select menu, point to Modify, and then click Border.
- When the Border Selection dialog box is displayed, type 50 in the Width Box. Click OK.
- Go to Select, Modify, Smooth, type sample radius of 50 pixels.
- To fill the border, go to Edit, Fill, select color and then choose a color that will coordinate with the picture or you can choose black or white lower in the list. In the mode list select normal. In opacity, type 100%
- Click the Image Size command on the Image menu. When the Image Size dialog box is displayed in the Document Size area, type 1.75 in the Height box. Click the OK button.
- Save the resized file in the PS_Ch1 folder with the new file name, Student_for_Print. If a JPEG Options dialog box is displayed, click the OK button.
- You are to add a text box to match the image and border with your name in it. It should complement the picture with color and size.
- The Instructor will do a visual check of your files. DO NOT PRINT.
- Quit Photoshop.


