Photoshop Chapter 2: In the Lab 2
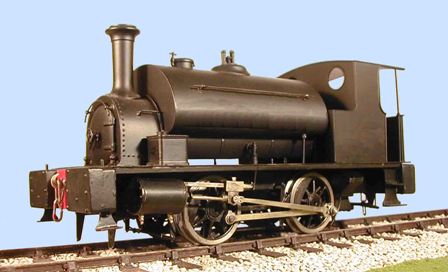
Problem: Hobby Express, a store that specializes in model trains and remote control toys wants a new logo. They would like to illustrate the concept of a train engine that looks like it is racing to the store. The picture will display on their letterhead, business cards, and advertising pieces. They would like a digital file so they can use the logo for other graphic purposes. The edited photo is shown below.
Instructions:
- Be sure and read the Problem above. You need to know why you are working on this project in pretend world.
- Start Photoshop. Set the default workspace and reset all tools.
- Click on the Giraffe.jpg image in the assignment in Google Classroom to open it in a new window.
- When it opens in a new window, click on the kabob in the upper right hand corner and click on Open in New Window
- When it opens in a new window again, click the download icon
- Open the image in Photoshop from your Downloads folder.
- (5 points) After you open the file in Photoshop, you are to save it in your Documents/Photoshop/ps_lesson_2 folder as Engine_edited.
When Photoshop displays a JPEG Options dialog box, type 8 in the Quality box, and then click the OK button.
- Click the Magic Wand Tool (W) button on the Tools palette and deselect the Contiguous check box on the options bar. Type 32 in the Tolerance box. Select all of the blue background.
- To add the green grass in the lower-right corner of the photo to the selection, on the Magic Wand options bar, click the Add to selection button. Type 50 in the Tolerance box, click the Contiguous check box so it displays its check mark, and then click the grass.
- Press the DELETE key to delete the selected areas.
- On the Select menu, click Inverse.
- On the Edit menu, point to Transform, and then click Warp. When Photoshop displays the warp grid, locate the upper-left warp point that displays as a gray circle on the grid. Drag the warp point to the right until the smokestack bends slightly.
- Right -click the selection and then click Skew on the shortcut menu. Drag the upper-left sizing handle to the left front of the engine should appear closer than the rear. The smokestack should curve backward to simulate motion. Apply any transformation.
- You are to add a text layer with your name on it. Be creative with it.
- Save the photo again
- (4 points) You are to submit two images, a jpeg and a psd.
- (This step only if your instructor is present) Go to File and Print. You will preview the document for your instructor to see instead of printing. Raise your hand and wait patently for your instructor to view your document.