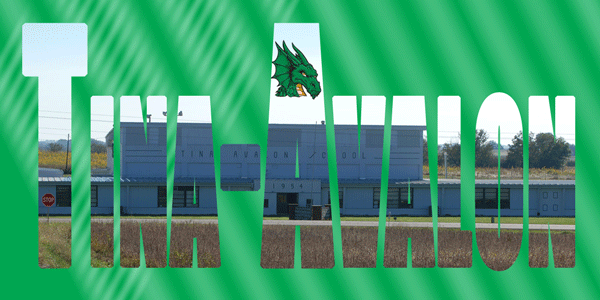
Photoshop Lesson 6: Placing A Photo Inside Text
- Create a document from scratch
- Place a picture in text
- Layers palette placement
- Apply gradients using the Gradient Tool
LESSON
- Go into PhotoShop and choose New from the File menu
- Name the file photo_text_t-a
- Change the width to 24 PICAS, the height to 12 PICAS, RGB color, and the resolution to 300 pixels/inch with a white background.
There are 6 picas in 1 inch. If we were to convert the measurement into inches what would it be?
- FYI - You would choose grayscale ONLY if you wanted the fill image to be gray - you do not.
- Click OK
- Save your text fill file in your PS_Unit2 folder (you will have to create this folder) save as photo_text_t-a
- Type d on the keyboard so that the foreground/background colors will be set to the default colors.
- Choose the type tool from the toolbox and click in the middle of your window
- Set your font to Impact and font size to 58. The Horizontal Scale should be set to 110%.
- Type the text (TINA-AVALON) in all caps. After you have typed the text, play around with the horizontal scale to see how it affects the text.
- Open the image t-a_school that will fill the type.
- Select the image (Command A) and using the Move tool, move the image into the image that contains the type.
- Rename the image layer School.
- In the layers palette, position the School layer above the text layer.
- Be sure to Deselect the image. You will need to resize the image in transform mode. Be sure and lock the aspect ratio so you do not skew the image.
- Put your curser in between the text and school layers and hold down the alt key and left click to lock the layers.
- You will still be able to reposition the fill image by clicking and dragging the mouse around on the image layer.
- We are going to go one step further and ad another image. Go into the student folder and open dragon_no_text.
- While in the dragon_no_graphic image use the magic wand to select the white part of the image. Go to the menu bar and click Select then Inverse. That should select the dragon image only. Use the Move Tool to select the dragon and move it to the photo_text_t-a image.
- Rename the image layer Dragon.
- In the layers palette, position the Dragon layer above the School image layer.
- Put your curser in between the Dragon and School layers and hold down the alt key and left click to lock the layers. Be sure to Deselect the image. You will place the Dragon image in the top part of the A in Avalon. You will need to resize the image in transform mode. Be sure and lock the aspect ratio so you do not skew the image.
- You are to add a gradient background that compliments your picture on the background layer to complete your picture.
- Flatten your text fill file by going to Layer>Flatten Image then Undo in your history palette.
- Submit as a JPEG, PSD and a Screenshot with Layers
- Answer to #3 = 4 inches by 2 inches (24/6 and 12/6)


