Photoshop Chapter 3: In the Lab 1
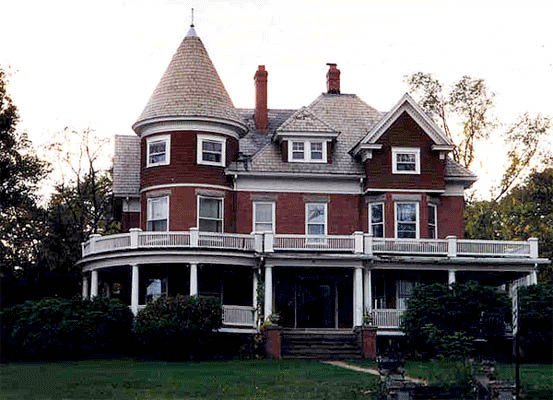
Problem: A local tourist company has hired you to create its latest brochure about historic homes. you encounter a photo that is too dark to use in the brochure. You decide to try adjusting the levels to lighten the trees, grass, and bushes in the photo and prepare it for print in the brochure.
Instructions:
- Start Photoshop. Set the default workspace and reset all tools.
- Go to the Photoshop Chapter 3 shared folder and open the Historic Home file.
- After you open the file in Photoshop, you are to save it in your Documents, in the ps_lesson_3 folder as Historic_Home_edited. Click the Format box arrow and click PSD in the list. Click the Save button. If Photoshop displays a Format Options dialog box, click the OK button.
- Use the Navigator palette to zoom the photo to 100 magnification, if necessary.
- On the Tools palette, right-click the current lasso tool. Click Lasso tool on the context menu. Drag with the Lasso tool to draw around the house. Stay as close to the house itself as possible. Do not include trees, bushes, or the sky.
- Press the W key to activate the Magic Wand tool. On the options bar, click the Add to selection button and then, if necessary, click the Contiguous check box so it displays a check.
- In the document window, click the Sky.
- Click Select on the menu bar and then click Inverse to select the inverse of the house and sky which would be the trees, bushes, and grounds.
- Click Layer on the menu bar, point to New, and than click Layer via Cut.
- In the Layers palette, rename the layer, grounds.
- With the layer selected, press COMMAND+L to open the Levels dialog box. In the Input Levels area, drag the white slider to the left until the grounds are lighter and the features easily discerned, and then click the OK button in the dialog box.
- On the Tools palette, double-click the Set foreground color button. When the Color Picker (Foreground Color) dialog box is displayed, click a light blue color, and then click the OK button.
- Press the W key to activate the Magic Wand tool. On the options bar, click the New selection button and then, if necessary, click the Contiguous check box so it displays a check. In the Layers palette, click the Background layer. In the document window, click the sky.
- Click Filter on the menu bar, point to Render, and the click Clouds.
- Place a picture of you somewhere in the picture large enough that the instructor knows it is you. Have fun and be creative with it.
- Press COMMAND+S to save the photo again.
- Press SHIFT+COMMAND+S to access the Save As dialog box. Choose the TIFF format and name the file Historic Home Complete.
- Go to File and Print. You will preview the document for your instructor to see instead of printing. Raise your hand and wait patently for your instructor to view your document.