Photoshop Lesson 1: Editing a Photoshop Image
- Start Photo shop and customize the Photoshop window
- Open a photo
- Identify parts of the Photoshop window
- Explain file types
- Save a photo for both print and the Web
- Edit a photo using the Navigator palette and the Zoom Tool
- Crop and resize a photo
- Create a blended border
- Print a photo
- Use Adobe Help
- Close a photo and quit Photoshop
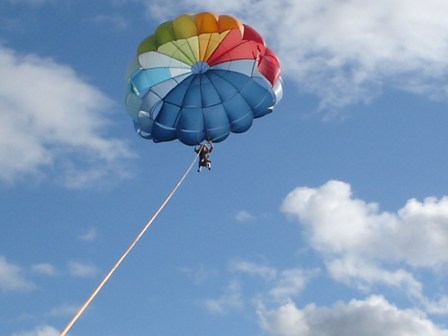
Original Photo |
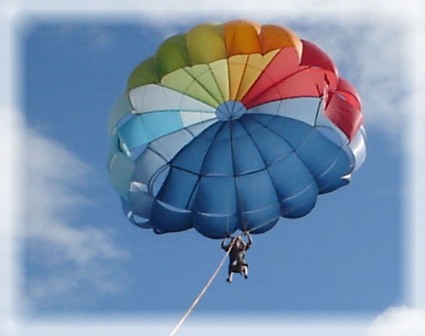
Edited Photo |
 |
 |
Key Terms:
A border is a decorative edge on a photo or a portion of a photo. A border visually separates the photo from the rest of the page. Rounded borders soften the images in a photo. Square borders are more formal. A border must define how many pixels wide a border will be. That is why you enter the width in pixels.
A pixel is an individual dot of light that is the basic unit used to create digital images.
When you fill a selection, you blend a color or a pattern into the selection area. Blending modes are the ways in which pixels in the image are affected by a color. Opacity refers to the level at which you can see through the color to reveal the paper or layer beneath it. For example, 1% opacity appears nearly transparent, whereas 100% opacity appears completely opaque (nontransparent, cloudy, filmy, blurred, smeared, smeary, misty, hazy; dirty, muddy, muddied, grimy, antonym transparent, translucent, clear.).
Sometimes it is necessary to resize an image to fit within certain space limitations. Resize means to scale or change the dimensions of the photo. Zooming in or dragging a corner of the document window to change the size is not the same as actually changing the dimensions of the photo.
To create a picture border for lesson 1:
- Command A - for select all
- Click Select on the menu bar, and then point to Modify
- Click Border on the Modify submenu
- In the Border Selection dialog box, type 100 in the Width box
- Click the OK button in the Border Selection dialog box
- To smooth the border click select on the menu bar, and then point to Modify
- Click Smooth on the Modify submenu
- In the Smooth Selection dialog box type 50 in the Sample Radius box
- Click the OK button in the Smooth Selection dialog box.
- To Fill a Selection Click Edit on the menu bar
- Click Fill on the Edit menu
- Click the Use box arrow in the Fill dialog box.
- Click White in the Use box list.
- Click the Mode box arrow
- Click Normal in the list
- If necessary type 100% in the Opacity box
- Click the OK button in the Fill dialog box
- To Deselect the image click anywhere in the document window to remove the selection.
Resizing the Image:
- Click Image on the menu bar
- Click Image Size In the Document Size area, double-click the value in the Width box and then types 4 to replace the previous value.
- Click the OK button.
- Click the status bar menu button
- Point to Show
- Click Document Dimensions
Printing a Photo
- Click File on the menu bar
- Click Print
- Put a checkmark in the Scale to Fit Media box.
- Do not print this time, I just want you to see how to do it.
To Save for Web & Devices
- Click File on the menu bar
- Click Save for Web & Devices
- When Photoshop displays the Save for Web & Devices dialog box, if necessary, click the 4-Up Tab
- Click the Zoom Level box arrow.
- Click Fit on Screen in the list
- Click the upper-right preview, if necessary
- Click the Colors box arrow
- Click 256 in the list, if necessary
- Right-click the upper right preview
- Click Size/Download Times in the list
- Click the Image Size tab
- Double-click the Width box and type 500 to replace the width value
- Click the Apply button
- Click the Save button
- When the Save Optimized As dialog box is displayed, type Parasailing-for-Web in the File name box.
- If necessary, click the Save in box arrow and make sure you are saving in your PS_Lesson_1 folder.
- Click the save button
Assignments:
- PS_Ch1_In_the_Lab_1
- PS_Ch1_In_the_Lab_2